
I owned a Stargate video game. Liked it, but needed Christmas cash and sold it. Got a Joust, enjoyed it, but not a lot of plays. Sold it. Robotron? Unlike other games, I have NEVER had an opportunity to buy one other than an occasional auction.
Then one day at an Auction, my friend Paul says to me - "Did you see that "Lotto Fun" game yet?" I said "No, why would I care?". "Because it has Williams boards in it". I won it for $100.
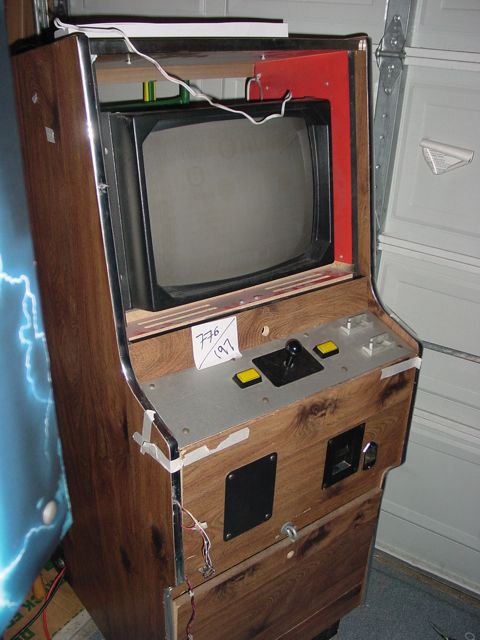
As you can see from the pictures above, it was a bit of a project machine. What I had bought was a Williams boardset with a hacked wiring harness, a working Monitor and a cabinet. At first I thought I might take the boards out and convert it to some other game, then the idea of converting it to a Multi-Williams came along, but I couldn't figure how I would re-do the Control Panel. Since space in my garage was tight, I decided to clean the parts out of the cabinet and decide at a later date what to do with them. I gave away the empty cabinet to the first person who got to my house to pick it up (it was actually in pretty nice shape). I asked Steve Zeuner what kind of boards they were and he told me they were definatly "Later" boards. I was hoping for Joust/Robotron but didn't really do any research at this time.
>W
Time Passes...
Decision. Build the Multi-Williams in a Williams Cabinet. Now what totally sucks is that about 18 months previous, some friends of mine and I had acquired 42 or so video games in a bulk buy. We had TONs of converted Williams cabs. But they were all gone. Now I was looking for one. I talked to everyone I knew and nobody had anything on hand, so I waited for an auction. At the next auction, I sold my KickMan video game (to make room and generate some working capital) and bought a painted over Joust cabinet that had no boards but was complete with a Williams transformer and cabinet wiring. The cost was $15.00. It was a little beat, but I was planning on stripping and painting it anyway.
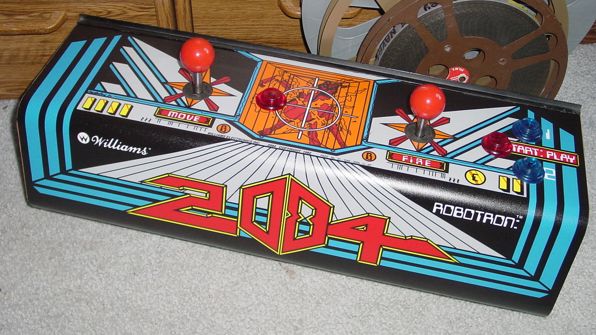
I decided that I wanted the feel of the proper controls for both Stargate and Robotron and the best way would be to have 2 control panels. A little more investigation and I would find that all I needed was a "Flap" button for both players in Joust and the Robotron panel should play Joust. Bubbles doesn't use a button, and Splat used 2 sticks like Robotron. I had the idea that I would wire the MultiWilliams connector to a big multi connector like an AMP or Molex and it would contain all of the wiring to all of the switches required for both contol panels. Then the control panel would use whatever it needed for the games it was playing. Again, Paul Frie helped out by giving me a wooden Robotron Control Panel that had an extra button hole drilled into it for some conversion game. Other than that, it was 100% Robotron configuration with the proper joysticks and original wiring.
2 weeks later, the auction company sends me a check for my KickMan that I sold and I order the Multi-Williams kit from Clay Cowgill at www.multigame.com. I also start ordering various other parts that I'd be needing from Bob Roberts and Steven Gregory's Arcadeshop like overlays, buttons, connectors, leaf switches, etc. I found some of the special switches for use in Williams games and Joystick centering grommets on e-Bay. Now all I needed was a wooden Stargate control panel and 2-way joystick. While chatting with Jon Exidy on one of the various chat channels, he offered to trade me a wooden panel with the joystick in exchange for the Robotron's CP wiring harness. I wasn't sure why he wanted to do this, but I took the offer.Figuring that I would be replacing the wiring (more later on this) I simply removed and labled the switches from the joysticks and mailed the completed harness away figuring that I would just buy new switches for everything.
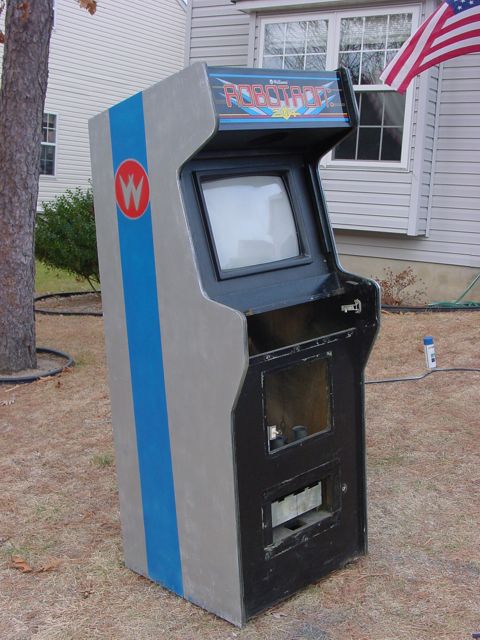
Also, within days of getting the money, I had the cabinet stripped (with help from Steve Zeuner) and repainted due to the fact that winter was coming and I wanted to spray it outside. I rushed it a bit but since all of my games are so tight together in the garage, the sides are the least of my concerns. I still took some time to stencil a Williams "W" on the side as shown in the picture below(I set the Robotron Marquee that my friend Rob Rhodes graciously gave me in the game for the picture).
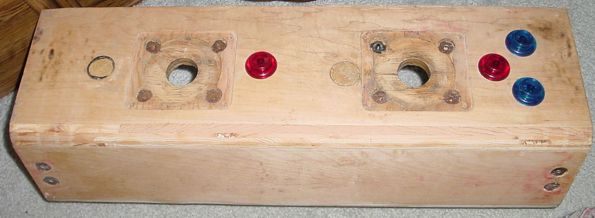
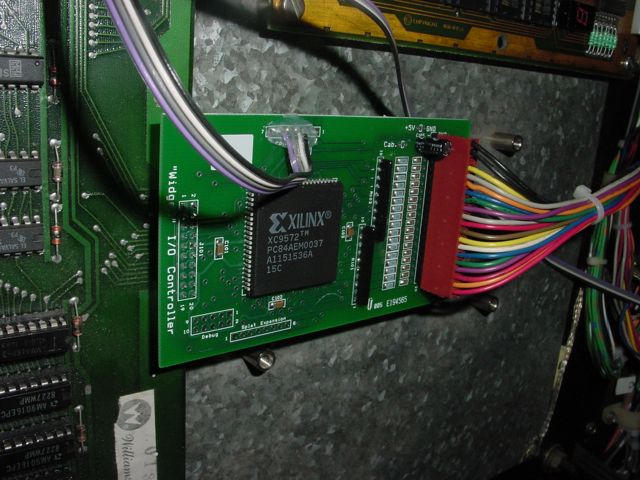
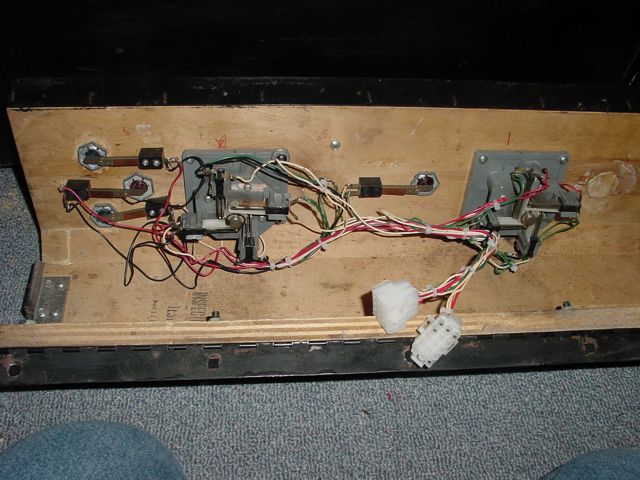
Next was the Robotron control panel. After removing 2 CPOs deep worth of glue, I decided that the holes that the operator had added to the CPO were in the wrong place because Joust uses a left stick right button configuration so this would be a problem. Also they weren't drilled evenly and they wouldn't work with my original type switches without a lot of hassles so I cut little circles of wood and filled them in. Then I measured off my own holes and drilled them with a couple of boring bits I got from Home Depot. The results were awesome. I was worried that the right player would keep hitting the 2 player button, but your hand goes naturally around it. I made up a wiring diagram for the two Control Panelss as follows (MultiWilliams Widget Board to 12(C1) & 15(C2) pin AMP connectors):
| MW | C1 | C2 | Description |
| 1 | 1 | - | GND |
| 2 | - | 1 | GND |
| 3 | - | - | KEY |
| 4 | 2 | - | P2 |
| 5 | 3 | - | P1 |
| 6 | 4 | - | LFlap |
| 7 | - | 2 | Hyperspace |
| 8 | - | 3 | Inviso |
| 9 | - | 4 | Smart Bomb |
| 10 | - | 5 | Thrust |
| 11 | 5 | - | Fire/RFlap |
| 12 | - | 6 | Reverse |
| 13 | 9 | - | Rt Right |
| 14 | 10 | - | Rt Left |
| 15 | 11 | - | Rt Down |
| 16 | 12 | - | Rt Up |
| 17 | - | 12 | Lf Right |
| 18 | - | 13 | Lf Left |
| 19 | - | 14 | Lf Down + SG |
| 20 | - | 15 | Lf Up + SG |
Since I had traded away my joystick switches, I ordered some that Steven Gregory thought might work. They were a little long on one blade, but cut down easily. They were a little loose when installed, so I put a wire-tie around it to hold it in place. Still a little loose but should be OK (we'll see later that it wasn't). Wired the CP in and built the cabinet's harness (that would run from the MultiWilliams Widget to the front of the cabinet).
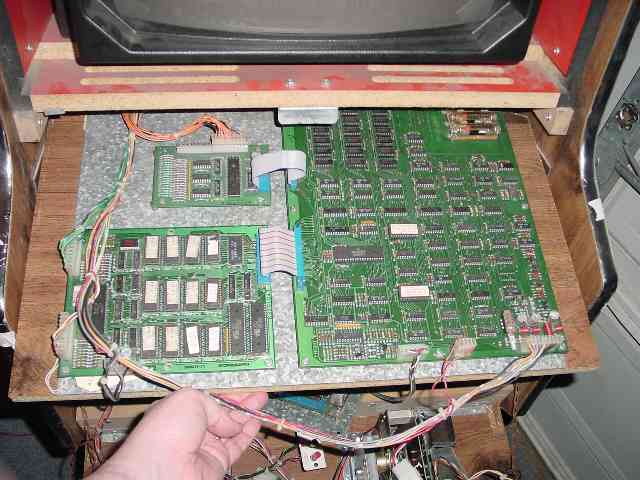
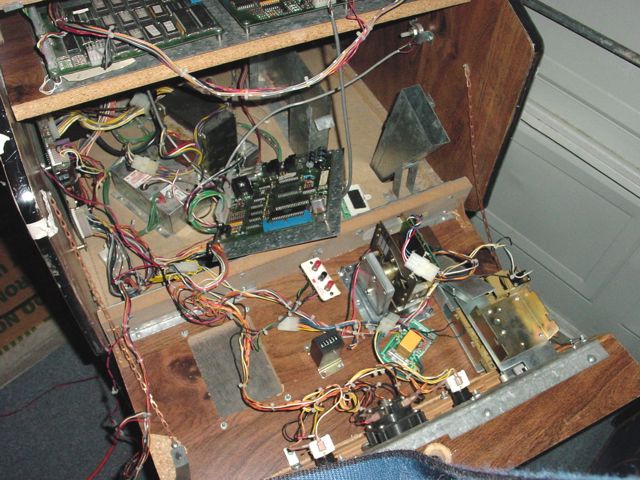
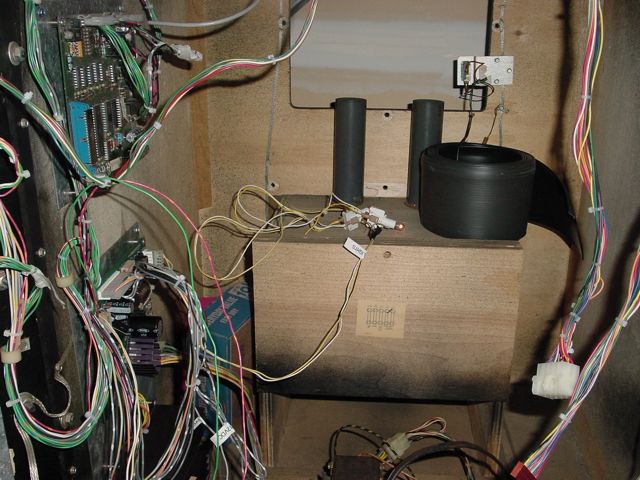
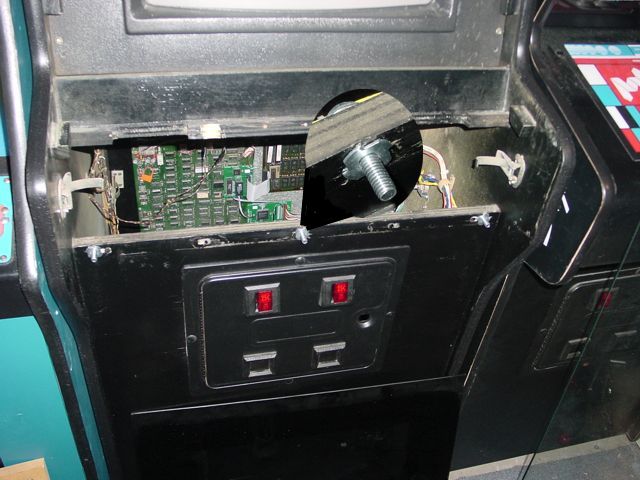
Now came the cabinet wiring. I assessd the cabinet I had and determined that I was in decent shape with the cabinet wiring. It also had an unaltered isolation transformer so it should plug into the Williams power supply I was going to replace. First step was to mount the boards. I was still under the assumption that these were Joust boards. Then I compared the wiring to the Joust wiring diagram. Pretty straight foward except that my wiring harness had some extensive changes in the controller section due to it's requirements to spit out tickets and such. First thing I did was to cut out the Williams/Controller wires and any other wires that were added for the Lotto Fun to function properly. I also noticed that the original "Widjet" board on my set was smaller than the holes for mounting it were and had extensive modifications to it. I figured that since the multi kit had a replacement widjet it didn't matter. All of the pin-outs on the boards were correct and the wiring took a little figuring but it all came together. I made a new video cable because the one I had was missing. Bob Roberts sold me a "Williams Connector Kit" and it included all of the connectors you need to replace everything. I asked him to upgrade the kit to include Trifurcon pins. These pins make better contact than standard ones and can solve tons of problems in games that use a lot of these connectors (like Pinball machines). As I remembered from testing the Lotto Fun, this had a problem anyway so the new cable was worth the time (and was now TriFurcon). I also took the time to label various wires as I came across them. My first goal was to get the Lotto Fun to boot in this new cabinet.
Wiring mostly finished and it was late but I couldn't see any reason not to try it as all of the required wires were there. Turned it on and watched for smoke on the boards and such. Using the mirror built in the Williams cabinets, I was able to look for a picture by sliding the monitor back a bit. I saw a whole bunch of wavy lines on the screen. This is good. It's signal. Not the one I wanted, but a signal. I checked and the connector for the monitor was wired backwards. A quick reversal and I was at the Lotto Fun setup screen! "YAY!!!" Pushing one of the coin door buttons got me to the main screen awaiting credits!
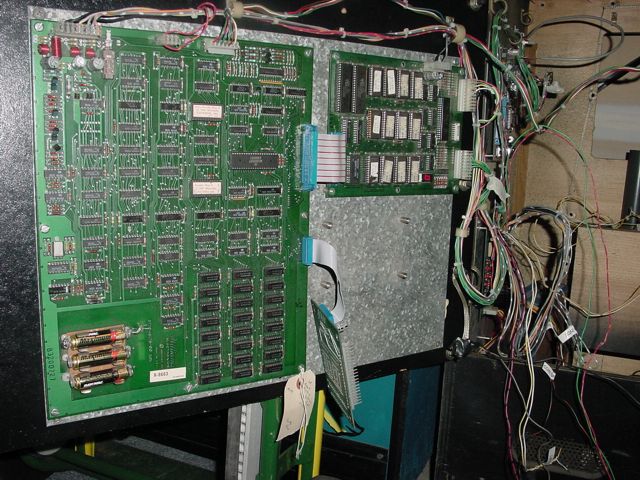
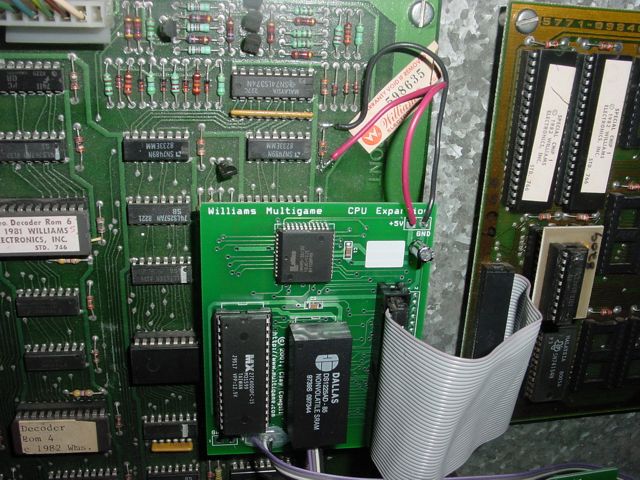
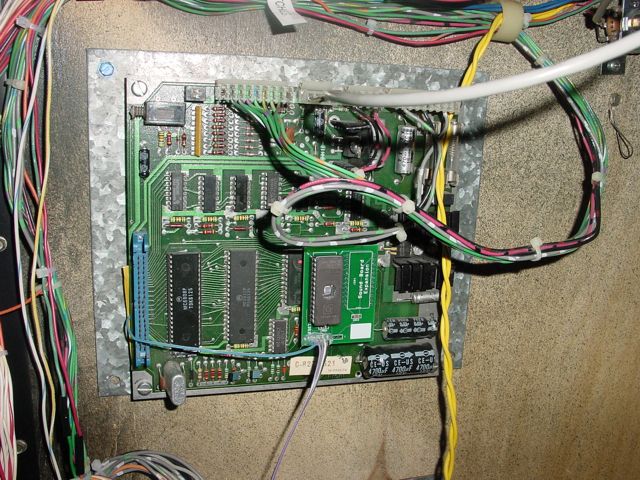
Now to clean up the wiring with some wire ties and do some miscellaneous painting like the front and coin doors. Aftewards, I replaced the T-Molding on the edges of the cabinet with some that I got from T-Molding.Com. I also had to figure out how to attach the control panel to the game for easy replacement. All while I was eagerly awaiting my kit from Clay. I took the time to compare my boards to the the ones in the pictures in the documentation that Clay has on-line (I LOVE this feature). Hmmm, Curious. An extra chip. Looks like I'd better do some more research. My friend Rob Rhodes is a big time collector of Williams games so I call him and ask for some help. He tells me that Stargate and Bubbles boardsets both don't have a revision number printed on them as my boards do not. Then I told him about the extra chip and he says "Those are Bubbles Boards". He even checks out his bubbles boards for me and we compare over the phone. Bubbles. Now Clay's page had mentioned: "The kit is designed to be installed on a Robotron or Joust CPU board. (Although a Bubbles or *modified* Stargate board can probably be used. I have not tested those configurations.) Time to e-mail "The Man" and see what he has to say. According to Clay: "As for Bubbles, a couple people have used it successfully, but you need to build an adapter to convert the 40 pin CPU header on Bubbles to be the same as Joust/Robotron" which then goes on to describe the process. Lots of connections, lots of mods, but doable and I'll need a Joust/Robotron ROM board to make it work. Considering that Bubbles boards are more rare, my friend Rob comes to the rescue again and swaps me for a set of revision D boards with Robotron chips on them that he has tested in his Robotron machine. I plug them in and Robotron boots right up. "Big Yay!" Clay had also mentioned that my boards had shipped. It shouldn't be long now...
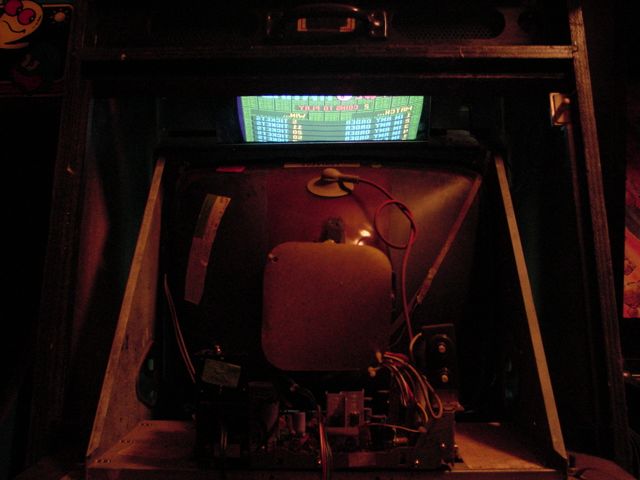
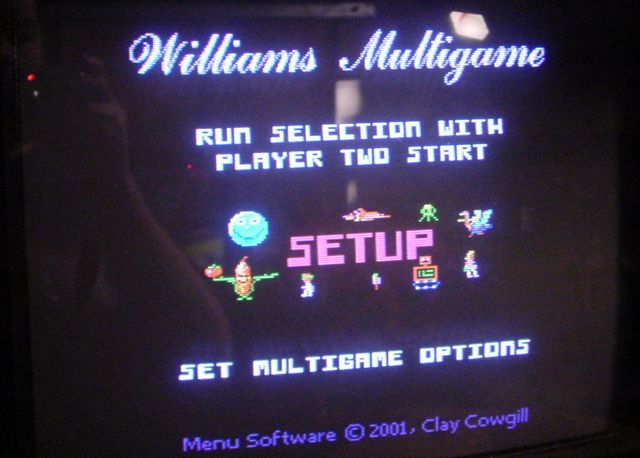
01/09/02 - If Clay shipped when he said he did, this was going to be the day it would arrive (I used the on-line UPS calculator). My wife called me at work. A small white box had arrived by UPS. Giddyup. Not only that but I had a lunch function at Dave & Busters in Philadelphia. This meant I would be getting home earlier. Since I had already memorized most of the installation manual, it was litteraly a 15 minute installation. The boards were back in the game and I applied power for the first time. I watched for smoke and the indicator number on the ROM board to light up. But that didn't happen. I looked at the monitor and there was a "Williams Multigame - Setup" screen showing. Cool.
Now I should mention that I still hadn't figured out how to mount the control panel yet. Since there would be two of them, I'd need a way of swapping them without a lot of hassles. Jon Exidy suggested "Wing Nuts" but I was trying to avoid them for some reason. I finally decided to just go to Home Depot and figure out what I could use. I came home with what I needed to install wing nuts. I used T-Nuts to put a bolt through the front. Then the CP simply slides on and the wing nuts and the original clasps hold the CP in place. It worked great.
The harness I had made from the new widjet board to the front was too short so I lengthened it by splicing in new wire to the center of each run one by one. All soldered and heat shrink tubed and it was a little too long but still usable. Plugged in the Control panel and turned on the game. Blank screen. Weird. Unplugged the control panel and the Williams Multigame logo was showing again. Looked at my rigged switches in the joysticks. There were some contacts closed. Plugged in the connectors after opening some of them. I was able to start a game of Robotron. But the controls were "quirky" at best. It seems that the rigged switches had too much movement in them and were not working properly. I had an original replacement stick in my cabinet and I replaced the switches for one stick with those. Now I had one good and one bad. Again, Paul helped me out and offered me another stick with new switches. I put the new switches in and it played like a new game.
Next was the monitor Bezel. Whoever converted it, stripped the original art off of the glass and painted it black leaving a hole for the monitor. It wasn't a bad job really. They got the hole right where it belonged. The black was pretty boring though. While out on the internet I found a scan of the Joust marquee and downloaded it. I took it to work and printed it on transparency film in color. The results were awesome. I spray painted the back white and now had a little mini-marquee (or mini-header for Paul's sake). I scraped some of the paint from the bezel glass so that the mini-marquee would shine through, then I taped the marquee to the back of the glass. I tried an experiment in lighting it, but I wasn't ready to do that yet. I eventally made mini-marquees of all of the games included and put them on the glass.

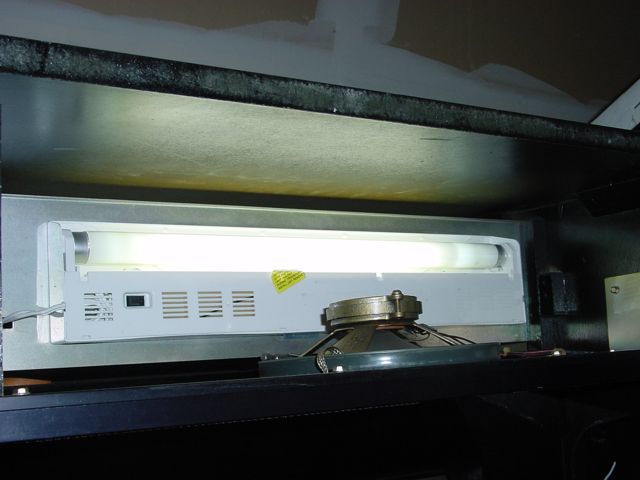
I tried to fix the original marquee light with a new starter and bulb but it didn't work. After playing with it for a an hour or so and getting nowhere, I put the light that was in the Lotto Fun in it. A little dimmer, but works perfectly. The speaker grille was broken and the previous owner put a car speaker grille over the hole. I removed all of it and covered the panel with "Speaker Fabric" that I got from Radio Shack. I had to do this to my Magic Sword and Ameridarts conversions and the results are awesome. It's not a "Commercial" solution, but works great for home use.
Jon Exidy's control panel arrived in mid-February, but it had a few more holes in it than it came with. Jon HAD attached a brand new stick to it and that was worth the trade alone. I fixed most of the holes, but never completed the job. Primarily because two of them showed up on eBay at the same time with one complete and the other missing a stick and having a bunch of old buttons and the wiring removed (but included - go figure). The second one went cheap because everyone wanted the nice one, but I had ALL of the parts and really only needed the wood. It arrived and was exactly what I wanted. I added my parts and ended up with a new Stargate Control Panel. The game plays beautifully with both control panels.
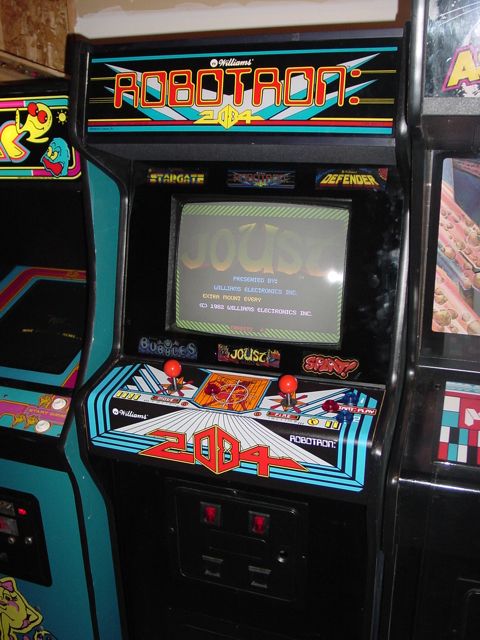
This is the finished game as of 02/24/02. Click here to see a 344K video of the various MultiWilliams screens and selecting Robotron to boot using the "Fast Load" option of the Williams Multigame. Really slick. Clay Cowgill should be commended for his work on this project as it's his finest kit yet.
Special Thanks to Paul Frie, Steve Zeuner, Rob Rhodes and Clay Cowgill. They made this machine a reality for me. Without theier help, it would be a pile of boards in a box right now. It's great to know that I have such good friends.